Updated as of 6-6-2012 at 1:22am
Start of entry
To begin this very long entry. I feel it is important that i cover some reasons as of to why i'm not simply spitting out arbitrary values for people to use for compressing. while doing that would allow everyone to achieve better numbers and image quality, you would ultimately not understand why that is and be befuddled once something changes.
Why Compression Exists
Compression exists for one of 3 reasons, the storing medium
is not large enough to store the uncompressed raw data, its bandwidth isn’t
wide enough to deliver it in real time or the file in question is simply not
needed in any higher quality.
Situation 1 is rare these days as physical disks are now
capable of storing upwards of 50GB's per disk (25GB's per layer on Blue-Ray
disks) and hard drives are easy to acquire with capacity’s over 1TB. This
reason for compression was more prevalent when hard drives were measured in
Mega Bytes and Floppy disks were the norm for portable media.
Situation 2 is currently the most common situation. The
internet is the primary delivery method of digital media in our current society
and as such the medium will be constrained to the maximum possible sustainable
data rate of the connection to the distribution server. Now that’s a whole lot
of mumbo jumbo to most so simply, your connection to the internet. the average American
internet speed in a developed part of the country lies between 8Mb/s and
16Mb/s. (networking is measuring in bits instead of bytes. 1 byte = 8 bits) as
such sites like YouTube and other services optimize their view transfer
services for working with in these constraints. typical bit rates of these
videos are less than 1MB/s. (a 720p .mp4 I’ve archived from YouTube has a total
bit rate of just 810Kb/s, 658Kb/s of which is video and 151Kb/s is audio).
another deliver method that is bandwidth limited is in fact your hard drive and
Blu-ray disk, the average consumer hard drive from 2008 can only reach a
maximum sustained threw put in the range of 40 to 60MB/s and 1x Blue Ray Drives
(what’s found on blue ray players) are in the rang of a mere 48Mb/s (4.8MB/s)
for their Video and audio combined. As such its becoming more apparent that you
truly don’t need a 50MB/s video file if your still working at the 1080p video
resolutions. (Unless this is for archiving in which case I would suggest a lossless
format which could run you in the gigabytes per second)
Situation 3 is what all of us will run in to once we have
finished this class. Because honestly, it isn’t necessary to store all of our
raw data left over from producing our animations, however deleting it all would
be a shame as it could prove useful later. This is where finding the right
balance of quality to file size is the most important and also the most
problematic. As the more space you will recover by compressing further you will
also lose more detail.
Why its important to understand
Compression is important to be familiar with why it exists and how it functions between algorithms in order to be capable of fine tuning your storage of media and for your presentation situations (as covered above). one of the most important things to remember when working with compressed media is to not over compensate for its compression.
Over compensation is what happens when you store a
128Kb/s .MP3 in a lossless .wav container and the same holds true for video. There
is no point in storing a 56000Kb/s video stream if the original was compressed to run at 512Kb/s. All that is achieved by this is wasting storage space and bandwidth on the same amount of quality. think of it like how a digital image shouldn't be resized to a larger resolution due to its loss of clarity and increase in data footprint. Only in this case you’re not losing clarity, just space.
However a small quirk of working with non lossless files comes when re encoding them. due to the way that decoders and encoders work, you will all ways loos some amount of data regardless of what you have done to the file. This is because lossy encoding schemes tend to toss out extra data
when re-compressing even if there has been no change to the data itself. (This
is why you want to use .png and lossless .tiff’s when working with still images
and not .jpg). In order to help counter acted this guaranteed desegregation of data, lossy files
always requires more data when re-encoded to store the same clarity of
data.
for example, If you were to decode a 128Kb/s MP3 and then store it as a freshly compressed
.mp3, you should set the bit rate to at least 196Kb/s in order to not throw out
what quality the audio had in the original 128Kb/s .MP3.
Now that your probably starting to gone in agony at the thought of your precious work being slowly destroyed by the terrors of lossy digital storage. Don’t run out to find the nearest lossless video codec and
container to store your precious videos in, there’s no point to it as they will
fill your storage system faster than Han Solo shot Greedo in Star Wars. I have worked with them from time to time and the ratio of clarity to file size just isn't worth it for long term storage. 30 seconds of footage at 1080p will eat
up around of 2GB's instead of a paltry 256MB's of a well encoded lossy file while looking nearly identical.
Codec Comparisons
so now that I’ve filled this entry with more text than most people will with 3 blog entry's, we're finally on to the part where we get visual!
I have covered some codecs I’m familiar
with along with pixel by pixel comparisons of how each one handles compressing to identical quality settings along with file sizes. this demonstration gives a visual quality comparisons at low medium and
high bit rates on a high jitter video file that is losslessly compressed.
The Base Line
The input file is a 8 seconds and 15 frames long recording
from the game Crysis running CCC level 6 mod, 8x MSAA, 16x AF, recorded at 1/3 game speed and 1080p. The RAW file can be had as a split 7zip archive at the following links.
Part 1 Part 2
Here I present a still from the RAW .AVI file at exactly 3 seconds in. All subsequent images are at the same time code however from their respective encoded videos.
This will be our base image and is considered the absolute
highest quality video (as it pretty much is)
Here is the file information for it.
Size: 381 MBs
Codec: FPS1
Container: AVI
Decode Format: Planar 4:2:0 YUV Full Scale
Length: 00:00:08:15
Frame Size: 1920x1080
Data Rate: 746496Kbps
Total Bitrate: 746496Kbps
Frame Rate: 30 FPS
Compression Comparisons
So now, on to the actual compression now that we have our baseline
and the generality’s covered.
First I will cover some differences between H264, Motion JPG
A, Photo JPG, and MPEG4 video compression algorithms. All of them are Lossy
systems in which some data is guaranteed to be lost when encoding to them,
however some are more efficient at different levels of compression and some are
just plainly worse at reaching lossless compression looks.
To start off here are what all of the files look like after
being encoded with 100% quality settings and all quality optimizations turned
on in Adobe Media Encoder CS5.5.
H624
309MBs
Motion JPG A
689MBs
Photo JPG
622MBs
427MBs
Minus the Gama value discrepancy of the Motion JPG A codec
they all look the exact same right? Well they should seeing as these files are all
around or larger than the original file. However even at this level of compression
there are discrepancies, minor but some.
Minor Discrepancy’s
(section to be added)
Visualization of Compression
following are stills form the processed videos. the images have been processed in photoshop to exaggerate
the visual noise that each respective codec induces to videos when encoding to it. All images were processed using the exact same settings and as such the
amount of noise and the type of it visible in the images is to be considered indicative of the differences of the
codecs when running. All images have been re-toned for that a value of
51 out of 255 is the maximum brightness level in order to make the compression marks more visible. the closer the image is to pure black then the less noise the compression codec induced and as such the higher the fidelity of the resulting image.
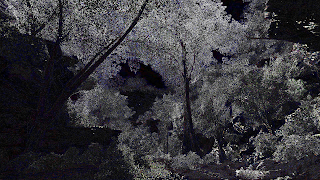
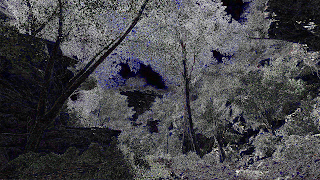
100% Quality Compression
for this comparison, i have processed stills form exactly 3 seconds in to each respective video against one taken form the uncompressed AVI file.
H264
Motion JPG A
Large discrepancy’s here due to Gama shift
Photo JPG
MPEG4
As you can clearly see from these comparisons, some codecs are innately
better for working with when storing as lossless of an image as possible. The MPEG4
image has clearly despite being set to 100% quality thrown out the most data of
all the codecs and shows the sharpest variance from our Lossless file. Meanwhile H264 and Photo JPG prove to be the most true to the original
image with Photo JPG showing the least amount of noise. Sadly I cannot use Motion JPG A in this comparison due to Gama problems,
however that alone should disqualify it from this round up. However I'm still including it for I feel it may just be a encoder setting that i missed.
For a bit of fun, here’s what YouTube did to this file.
(6.02MBs, 1080p .mp4)
ugly isn't it?
This image is a direct averaging of the whole images from above in order to give a direct sense and applicable values to each codecs variance from absolute 0 (no compression). My ratings primarily go by its V value in the HSV sRGB color interpretation system. Once more the closer the color is to my 0 Point then the better the codec is.
All demo images from here on down will be processed against their respective codecs 100% Quality Compression encoded videos. this is to eliminate the possibility of Gama shifts throwing off the noise values as so aptly demonstrated in the 100% Quality Compression. all comparisons are done from the same frame 3 seconds in on their respective compressed video.
90% Quality Compression
This low level compression section lacks any true us fullness as it typically results in files larger than desired and is compressed further than i would recommend for archival purposes as the compression marks are noticeable to a trained eye in stills.
H264
304MBs
if you compare the file size of the 100% and 90% H264 files you will notice that there is hardly any differences but this image demonstrates a noticeable amount of noise.
Motion JPG A
355MBs
Photo JPG
324MBs
MPEG4
427MBs
direct average
50% Quality Compression
I have found that the resulting files form this compression level are generally optimal for general usage in demos and class presentations. When in motion the compression artifacts are not noticeable and the file size is right in what i consider the sweet spot of less than 200MB's.
H264
150MBs
Motion JPG A
175MBs
Photo JPG
152MBs
MPEG4
115MBs
direct average
10% Quality Compression
This compression level is primarily touched on simply for demonstration of the noise levels of highly compressed video files. i have noticed that in class people generally have been spitting out gigabytes worth of video or something small enough to fit on a hand full of floppies. All of these videos in motion are rather ugly and really should never be used for an art presentation. (perhaps Email but even then you can just link them to a download of a much higher quality file)
H264
40MBs
Motion JPG A
64MBs
Photo JPG
56MBs
MPEG4
32MBs
direct average
150MB File Quality Comparison
For a simpler to rationalize comparison of size to noise ratios i have provided a comparison of the 4 codecs when encoded to as closely meat 150MB's as possible.
H264
Motion JPG A
Photo JPG
MPEG4
(refused to go to 150MBs so the nearest value was
selected at 165MBs)
Quite obviously from these demonstrations, MPEG4 should never be used due to its constant higher level of noise at all compression levels. i would only ever advice its usage in situations where any of the other three codecs will have problems (sensitive play back devices and real time sycrinisation) however this compression discrepancy can be partly excused because it consistently produced the smallest files.
H624 and Photo JPG were neck and neck throught much of the compression comparisons with minor differences all the way up till the 10% test where H264 started distorting the overall color tone of the images. At near lossless compression settings (100%), Photo JPG produced the cleanest image results however it was also one of the largest files at twice the size of H262.
At the higher compression levels
of 50% the two codecs are nearly identical in file size with normally
less than 5 MBs of difference however now is when the differences in their method of compressing starts coming in to play on the types of digital noise they leave behind. in this department 50% H264 wins hands down in the noise department producing very noticeably
less noise than all of its competitors however there is a noticeable blue tone to the noise.
At 10% the differences between each codecs noise level is getting
far harder to determine. As Photo JPG is only marginally better than Motion JPG
A. H264 proves to have finally met its match and breaks down quite a bit producing an image that is only marginally better than Photo JPG. However at this high of compression the artifacts are becoming more noticeable in what information they leave out. H264 has gained a interesting color shift when compared to Photo JPG.
The whole
image is tinted slightly yellow along with large patches of blue. another interesting turn of events at this compression level is that Motion JPG A is actually on par with Photo JPG if not better due to less color noise and slightly dimmer noise.
As a simple conclusion, the video codecs stack like this for the different compression ranges
100%
H264
Photo JPG (lost due to file size)
MPEG4
Motion JPG A (lost due to Gama shifts)
90%
H264
Photo JPG
Motion JPG A
MPEG4
50%
H264
Photo JPG
Motion JPG A
MPEG4
10%
Photo JPG (i like the noise this produces more than the rest)
H264
Motion JPG A
MPEG4
Feel free to evaluate the images provided and give comments/critiques on my methodology and practice. i am looking in to how to further refine these comparisons as the averaging technique i implemented is not particularly the best as Photo JPG along with Motion JPG are more even in their noise patterns while H264 and MPEG4 are more clustered in where their information is removed. (think of it like smoothing out the image for those two)
Additional Things Not Covered
- Conditional compression (when it is better to use some codecs than others)
- Noise levels and production in different video movement. (I've only covered a primarily static image that contains a large number of minor movements)
- Encoder options (Optimize stills, single VS duel pass, variable VS constant)
Now, I am so far out of time and space to continue. Just prepping everything for this compression article has taken me 10 hours to complete. (a few
mistakes are easily compounded when working with 20+ videos that all look the
same)
I will make a simple graph when I get some time for
simplifying the data. I’m hoping I can come up with a
mathematical method of representing the amount of noise and its color value for
this graph. also planning on covering how some algorithms smooth images slightly (such as h264). Now I just need to code this in to the blog (another pain in my
rump) before I give an attempt at adding sound to my video...(btw, those sound files we got in class were worthless)
update_8
- further limitations of this compression test/guide have been identified that leave this only viable for Quick Time compression.
update_7
- added some clarification per requests on what the second half of the article is for.
- Additional things section has been added
- Minor Discrepancy’s section still missing
- moved the Update log to the bottom
update_6
- had a rough night with my family, sorry for the delay. couldn't bring my self to do anything.
- entry is nearly complete! just missing the minor
discrepancy's section which would cover the smoothing effect some codecs
have on sharp images.
update_5
- further revision to posts texts and formatting
update_4
- general revision to texts and alignment data (incomplete)
- noticed an issue in the manner in which blogger
handles large PNG files that saddens me... guess i will have to host
them off site. (cant fix this till after 5)
update_3
update_2
- my file hosting service will only permit 200MB or smaller files so the uncompressed AVI will be in a 7zip split container.
update_1
- noticed a processing error on the MPEG4 test images
that would explain for why they all look like shit. will fix this later.
(i am not looking forward to dealing with blogger again)
update_0
- Blogger sucks, end of story. its messing up every step of the way...


 Just start setting a bunch of points where ever
you want stiff spot and it won’t change those when you start moving their
related points around.
Just start setting a bunch of points where ever
you want stiff spot and it won’t change those when you start moving their
related points around.

 This allows you to
specify parts of the puppet that will
This allows you to
specify parts of the puppet that will 


